Sunday, 25 May 2014

Accessing your VirtualBox localy

Hi there, following on from VirtualBox networking. The next thing we need is to allow for easy sharing of files between the host and guest. Now we could use something like FTP or samba. However VirtualBox provides a built in feature to map a Host folder on to the guest file system. I will be honest its a bit tricky to get working, but hopefully this post should help.

So there are 4 steps to do this.
  1. Select the folder to share
  2. Install packages needed by VirtualBox
  3. Install VirtualBox's guest tools
  4. Mount the shared folder
From the main screen.
VirtualBox: mainScreen
Open the settings
Settings/SharedFolder
Click the Add icon. To add a pointer to your local folder that you want to share.
Add Share
Select your folder, check "Auto-mount" & "Make Permanent"
Add Share + info

now fire up your VM

Now, if we check are share in the bottom of the window


Ok. Before we install the "Guest tools" we need to install some required packages
sudo apt-get update

sudo apt-get install make

sudo apt-get install gcc

sudo apt-get install dkms


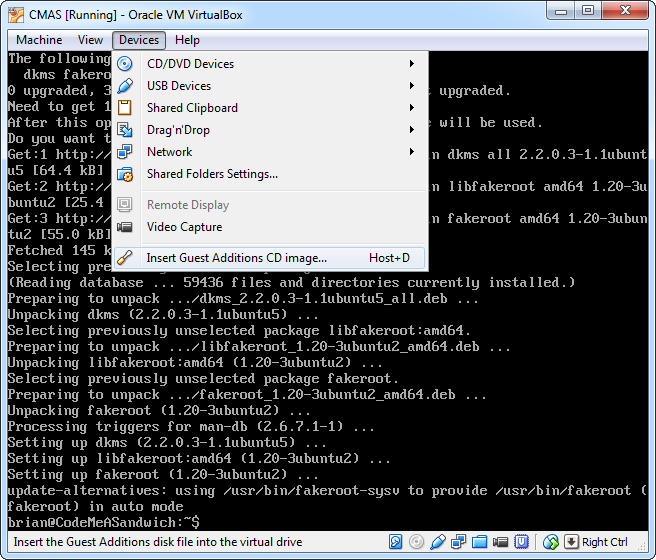
Now we need to attach the "Guest Tool" installer image. Its very easy

After you have click it. You won't get a prompt.
If you may get something like this

Just press "Force Unmount"
Now mount the "Guest Tool" image
sudo mount /dev/cdrom /mnt

Next to to run the installer for Linux
sudo /mnt/VBoxLinuxAdditions.run

Make the folder we want to map into
sudo mkdir /remoteShare

This will take the shared folder on the host machine mirror it to the guest folder. *remember you refer to host folder by its alias.
sudo mount.vboxsf myShare /remoteShare

Now you can move in to the folder
cd /remoteShare/

If you have added some files locally. you can see them with the 'ls' command
ls -l


All done.
... continue reading!

Saturday, 24 May 2014

Getting VirtualBox Wired

Hello boys & girls. One think people my not know about me, is I love using VirtualBox as my test environment. In a nutshell: It allows you to simulate your production environment for testing your code. All without too much hassle.

So, in this post I'm going to go over a simple thing you will need, and that is to give your VM access to the Internet + network access to talk to your host.

let's dive in. For this example I'm running Windows 7 as the host and Ubuntu 14 as the guest. I'm not going to cover installing Ubuntu in this guide, but I'm sure you can find some help DuckDuckGo: Installing ubuntu on VirtualBox ^_^

Before starting the VM we will need to make a small change to the VM's settings. Because of VirtualBox internal architecture it requires two network cards in order to connect to the WAN(internet) and also connect to the host. As it will be convenient to be able to do both at the same time.. we have to do the following.

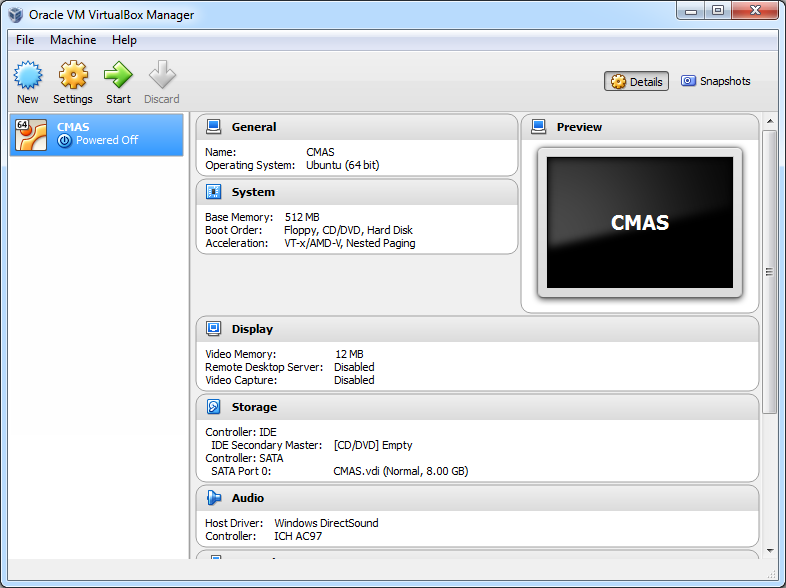
Open VirtualBox
VirtualBox's mainScreen
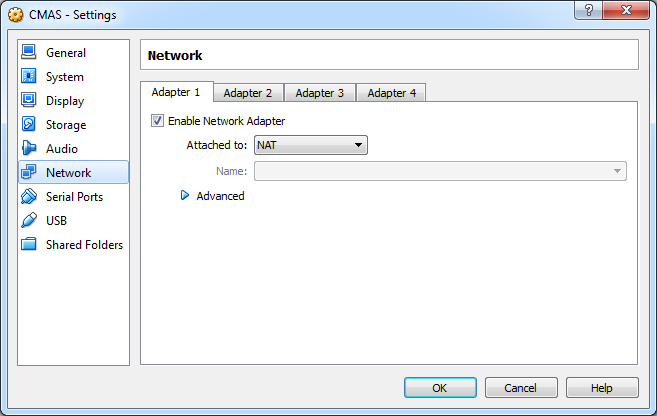
From the main screen to go "Settings"
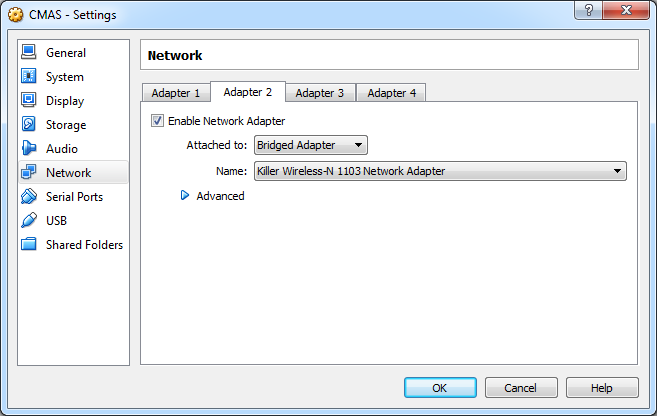
Now open the 2nd adapter tab.
Check "Enable Network Adapter" and select "Bridged Adapter" as the "Attached to"

Now we can fire-up your VM.
First, let's take a look at what network interfaces are already set up.
Enter the ifconfig command

brian@CodeMeASandwich:$ ifconfig
eth0 Link encap:Ethernet HWaddr 08:00:27:fa:##:##
inet addr:10.0.2.15 Bcast:10.0.2.255 Mask 255.255.255.0
inet6 addr: f680::a00:27ff:fefa:46e8/64 Scope:Link
UP BROADCAST RUNNING MULTICAST MTU:1500 Metric 1
RX packets:26 errors:0 dropped:0 0uerruns:0 frame:0
TX packets:34 errors:0 dropped:0 0uerruns:0 carrier:0
collisions:0 txqueuelen:1000
RX bytes:3483 (3.4 KB) TX bytes:3398 (3.3 KB)

lo Link encap:Local Loopback
inet addr:127.0.0.1 Mask Z55.0.0.0
inet6 addr: ::1/128 Scope:Host
UP LOOPBACK RUNNING MTU 65536 Metric 1
RX packets 0 errors:0 dropped:0 0uerruns:0 frame:0
TX packets 0 errors:0 dropped:0 0uerruns:0 carrier:0
collisions: 0 txqueuelen:0
RX byte$:0 (0.0 B) TX bytes:0 (0.0 B)


Here we see that there are two interfaces. eht0 is giving access to the WAN.. and lo is to allow the OS(here Ubuntu) to send messages to itself, because that's just what computers want to do sometimes.

Now we need to update the network interface file. To let the OS know there a new network available.

brian@CodeMeASandwich:~$ sudo vim /etc/network/interfaces
[sudo] password for brian:

Go to the bottom of the file and add the two lines:
auto eth1
iface eth1 inet dhcp


# This file describes the network interfaces available on your system
# and how to activate them. For more information, see interfaces(5).

# The loopbaek network interfaee

auto lo
iface lo inet loopback

# The primary network interface
auto eth0
iface eth0 inet dhcp

auto eth1
iface eth1 inet dhcp

let's save the file. Press Ctrl-C to switch out of insert mode. then type "wq" *wright & quit

:wq

Now restart the network service with "sudo ifdown eth1 && sudo ifup eth1"

brian@CodeMeASandwich:~$ sudo ifdown eth1 && sudo ifup eth1
ifdown: interface ethl not configured Internet Systems Consortium DHCP Client 4.2.4 Copyright 2004-2012 Internet Systems Consortium. fill rights reserved. For info, please visit https://www.isc.org/software/dhcp/

Listening on
Sending on
Sending on
LPF/ethl/08:00:27:98:##:##
Socket/fallback
DHCPREQUEST of 192.168.2.196 on ethl to 255.255.255.255 port 67 (xid=0x4596####) DHCPHCK of 192.168.2.196 from 192.168.2.1 bound to 192.168.2.196 -- renewal in 33968 seconds.

This should be quick. Lets see if our new interface was added.

brian@CodeMeASandwich:$ ifconfig
eth0 Link encap:Ethernet HWaddr 08:00:27:fa:##:##
inet addr:10.0.2.15 Bcast:10.0.2.255 Mask 255.255.255.0
inet6 addr: f680::a00:27ff:fefa:46e8/64 Scope:Link
UP BROADCAST RUNNING MULTICAST MTU:1500 Metric 1
RX packets:26 errors:0 dropped:0 0uerruns:0 frame:0
TX packets:34 errors:0 dropped:0 0uerruns:0 carrier:0
collisions:0 txqueuelen:1000
RX bytes:3483 (3.4 KB) TX bytes:3398 (3.3 KB)

ethl Link encap:Ethernet HWaddr 08:00:27:fa:##:##
inet addr:192.168.2.196 Bcast:192.168.2.255 Mask 255.255.255.0
inet6 addr: fe80::a00:27ff:fe98:c3bc/64 Scope:Link
UP BROADCAST RUNNING MULTICAST MTU:1500 Metric 1
RX packets:26 errors:0 dropped:0 0uerruns:0 frame:0
TX packets:34 errors:0 dropped:0 0uerruns:0 carrier:0
collisions:0 txqueuelen:1000
RX bytes:251203 (251.2 KB) TX bytes:1462 (1.4 KB)

lo Link encap:Local Loopback
inet addr:127.0.0.1 Mask 255.0.0.0
inet6 addr: ::1/128 Scope:Host
UP LOOPBACK RUNNING MTU 65536 Metric 1
RX packets 0 errors:0 dropped:0 0uerruns:0 frame:0
TX packets 0 errors:0 dropped:0 0uerruns:0 carrier:0
collisions: 0 txqueuelen:0
RX byte$:0 (0.0 B) TX bytes:0 (0.0 B)

And that's it! Do. You can now connect to your guest OS locally & it will also have access to the web.

... continue reading!

Thursday, 21 November 2013

Promises In CoffeeScript

Banner: Promises In CoffeeScript

Previously we discussed the benefits of the ‘Comb’ library. We will add to our knowledge here, by discussing ‘Promises’. We are not speaking of promises that are too good to be true! Rather that of a client system willing to fulfill or resolve an operation asynchronously, hence a ‘Promise’. We want to use ‘Promises’, to wrap our code sections, so that we don’t cause blocking in error handling. You will find that your code is also cleaner.

In these examples we will be using CoffeeScript, so we can get a flavor of that emerging language that compiles into JavaScript as well. You will also need to install require.js through the NPM. One tricky thing to remember about CS (CoffeeScript) is that even a tab or a space can cause the compiler to resolve something differently. Here ‘Promise’ has three supported methods that we will cover: errback(), callback(), and resolve().

# initialize the values
fs = require("fs")
comb = require("comb")

# Here we create function to read a file
readFile = (file, encoding) ->
 # Let’s wrap it with a ‘Promise’
 ret = new comb.Promise()
 fs.readFile(file, encoding or "utf8", (err) ->
  if (err)
   # Here is the fail codepath, something was wrong
   ret.errback(err)
  else
   # Success! Resolve the promise
   ret.callback(comb.argsToArray(arguments, 1)))

 # Return the promise object.
 ret.promise()

# Creates an errorHandler function, that writes to a log.
errorHandler = ->
 console.log("Error handler")

How do we use this? The beauty of ‘Promises’, is that you separate the success and fail code paths with a ‘then’ function. See this simple call:

readFile("myFile.txt").then ((text) ->
 console.log(text)
), errorHandler

Now let’s make this even easier: If we use the ‘resolve’ method, we do not have to handle the success and fail code paths separately. Now the ‘callback’ and ‘errback’ methods, are wrapped in a single ‘resolve’ method.

fs = require("fs")
comb = require("comb")


readFile = (file, encoding) ->
 ret = new comb.Promise()
 fs.readFile(file, encoding or "utf8", ret.resolve.bind(ret))
 # Return the promise object.
 ret.promise()

...
...

This version of the ‘readFile’ function does the exact same work as the above, but with a lot cleaner code! Now let’s build on this by adding a ‘listener’. Your purpose, is to listen for the resolution/fulfillment of a ‘promise’. We are looking for the task to be completed, or a failure. Using the ‘readFile’ function from above, the following is listening for a successful: You guessed it, a successful file-read.

readFilePromise = readFile("myFile.txt")

# ‘then’, Remember carries ‘callback’ and ‘errback’, or success and failure.
readFilePromise.then ((file) ->
 console.log("file")
), (err) ->
 console.log(err)

# Here we are ignoring the errback, it is optional.
readFilePromise.then (file) ->
 console.log(file)

Now let’s perform an action on the file after we listen for it to be read. In this sample, let’s convert the contents to uppercase. We can pass the new ‘Promise’ into the ‘Then’ method.

readAndConvertToUppercase = (file, encoding) ->
 ret = new comb.Promise()
 readFile(file).then ((data) ->
  ret.callback(data.toUpperCase())
 ), 
       # This is the errback, but here we can just pass, ‘ret’
       ret
 ret.promise()

readAndConvertToUppercase("myFile.txt").then ((file) ->
 console.log("file")
), (err) ->
 console.log(err)

Enjoy the full sample:

# initialize the values
fs = require("fs")
comb = require("comb")

# read a file
readFile = (file, encoding) ->
 ret = new comb.Promise()
 fs.readFile(file, encoding or "utf8", ret.resolve.bind(ret))
 ret.promise()

readAndConvertToUppercase = (file, encoding) ->
 ret = new comb.Promise()
 readFile(file).then ((data) ->
  ret.callback(data.toUpperCase())
 ), 
    # This is the errback, but here we can just pass, ‘ret’
    ret
 ret.promise()

readAndConvertToUppercase("myFile.txt").then ((file) ->
 console.log("file")
), (err) ->
 console.log(err)
... continue reading!

Monday, 4 November 2013

Web Workers

HTML 5: Web Worker Basics

So when working with javascript you may have not realised that it is single threaded.... So Brian, what's the big deal?

 To explain a little; For those new to threads. You can simply think of a thread as the normal flow of execution you have been working with. You start, call a function, do some work and so on. Its all very step by step.
So threads are the same basic idea, only they can talk to each other allowing for more work to be done in parallel.

The program starts execution as normal and then start sub-tasks in threads that will go off and do there work, then can give back the results of there labor. This is how people leverage the strength of multi-core computers.
However it will take a little shift in how you think of problems. ; )

In this post Im going to look at 3 areas
  1. How you setup and use a web worker
  2. Inlineing your web worker into one file
  3. Web workers in older browsers that don't support them

1. How you setup and use a web worker

Lets get into the meat and bones of an example:

index.html
 
< !DOCTYPE html>
< html>
< head>  


< body>
  

source.js
//load the WebWorker file
var worker = new Worker('webworker1.js');

//create the function to handle the response
worker.onmessage = function(response) {
  document.getElementById("jsOutput").innerHTML = "Received: " + response.data;
}

// Start the worker.
worker.postMessage(''); // *Note: You must pass a string or Json object

webworker1.js
self.onmessage = function(event) {
   self.postMessage('Message from WebWorker');
};

"Received: Message from WebWorker"

That it. Very easy. Just put the code you what to run into another js file and off you go.


You should be aware that Due to their multi-threaded behavior, web workers only has access to a subset of JavaScript's features:
  • The navigator object
  • The location object (read-only)
  • XMLHttpRequest
  • setTimeout()/clearTimeout() and setInterval()/clearInterval()
  • The Application Cache
  • Importing external scripts using the importScripts() method
  • Spawng other web workers

Workers do NOT have access to:

  • The DOM (it's not thread-safe)
  • The window object
  • The document object
  • The parent object


2. Inlineing your web worker into one file


let's take the above and combin it all into one file

index.html

The first thing we need is to move webworker1.js inside a script element on our page but we must add an id to the element so we can reference it. I used the same name was I used when it was in a file "webworker1"


Now we want to swap out the include with the contents of the source.js
 

becomes


You should note the first two line.

var blob = new Blob([document.querySelector('#webworker1').textContent]);
This grates a reference to are code block that we want our web worker to work on.

var worker = new Worker(window.URL.createObjectURL(blob));
and here we create our web worker based on that code block.


3. Web workers in older browsers


For this you can using web-workers-fallback This library provides basic compatibility for the html5 web worker api in browsers that don't support it.
To use it, you only need include Worker.js, and everything should work out of the box.

*As usual you should read the Limitations section and test in a browser that doesn't support web workers ;)


For more information on web workers see the great Mozilla Developer Network resource: Using web workers
... continue reading!

Friday, 25 October 2013

Welcome to Threejs


Continuing with my research into WebGL libraries this week I was looking at ThreeJs and recreating the same sample as in my previous example with BabylonJs.

With Threejs there are 2 ways to create your viewport.
  1. Is to dynamically create a canvas element, as above. This is how you can add you rendered seen in to a webpage as normal.
    *the size are there cameras is in pixels in the javascript source
  2. To feel the entire page
In this example I will be using the first approach, as the majority of examples you will find online references the fullscreen mode. To please the viewport on to the page, we first need a div where we want our viewport placed


Download the compressed version of the library at http://threejs.org/build/three.min.js and put it in the same folder as your files.


To help keep our code clean you will now create a "myCode.js". I hope you noticed that this file is the one referenced in the above section.

In side "myCode.js" we will add the following:
As we are rendering to a element on the page we need to define the width and height. These sizes are used to in the example to match the camera perspective with the rendered viewport.

var canvasWidth = 578, canvasHeight = 200;
var camera = new THREE.PerspectiveCamera(90, canvasWidth  / canvasHeight, 0.1, 1000);
    camera.position.z = 3;

Now we create a render and attach it to the viewport.

var renderer = new THREE.WebGLRenderer({antialias:true});
renderer.setSize(canvasWidth , canvasHeight);

var viewport= document.getElementById( 'renderCanvas' );
viewport.appendChild( renderer.domElement );

Now we create our 2 world objects

//THREE.TorusGeometry(radius, tube, segmentsR, segmentsT)
var torus = new THREE.TorusGeometry( 1.5, 0.35, 16, 32 );
// THREE.SphereGeometry(radius, segmentsWidth, segmentsHeight)
var sphere = new THREE.SphereGeometry( 0.3, 16, 16 );

We need to define a material to apply to our objects. Phong shading will give a nice shine.

var material = new THREE.MeshPhongMaterial({
        // light
        specular: '#ffffff',
        // intermediate
        color: '#ffffff',
        // dark
        emissive: '#000000',
        shininess: 100 
      });


 var torusMesh = new THREE.Mesh(torus, material);
 var sphereMesh = new THREE.Mesh(sphere, material);


Create a light sources in order to give the correct light and dark shading on the objects

var directionalLight = new THREE.DirectionalLight( 0xffffff, 1);
directionalLight.position.set( 0, 10, 10 ); 

let's create our scene and add the element to it.

 var scene = new THREE.Scene();
  scene.add(torusMesh);
  scene.add(sphereMesh);
  scene.add( directionalLight );

To add a bit of flavour let's animate the torus. This will be in the function that will be run every frame.

  var render = function () {
      requestAnimationFrame(render);
      torusMesh.rotation.x += 0.01;
      torusMesh.rotation.y += 0.015;
      renderer.render(scene, camera);
  };

let's start the animation.

render();

There you go done and dusted.
If you have any thoughts or feedback, let me know by leaving me a comment.
... continue reading!

Sunday, 13 October 2013

Welcome to Babylonjs

Welcome to the new world of 3D in your browser!
Today I'm going to show you just how easy it can be with a help from BabylonJs. BabylonJs is a high level wrapper on top of WebGL. With libraries like this, it is actually very easy to make things like the above scene.

The first thing we will need is some css for where we want the rendered image to be drawn.

       html, body {
            width: 100%;
            height: 100%;
            padding: 0;
            margin: 0;
            overflow: hidden;
        }
        #canvasView{
            width: 100%;
            height: 100%;
        }

Now lets put the canvas element inside the body. Canvas Is a new element introduced in HTML5, specifically for rendering graphics programmatically. So This is our view port ^_^


Download the compressed version of the library at http://www.babylonjs.com/babylon.js and put it in the same folder as your files.


To help keep our code clean you will now create a "myCode.js". I hope you noticed that this file is the one referenced in the above section.

In side "myCode.js" we will add the following:

function babylon(){
 //get a reference to the canvas element on the page
 var canvas = document.getElementById("canvasView");
 //create an instance of the rendering engine
 var engine = new BABYLON.Engine(canvas, true);
 //create an instance of a Scene.
 //This is used to house our camera, lights and shapes
 var scene = new BABYLON.Scene(engine);

Now that we have a Scene, we need to specify a camera

 //a Camera, so the renderer knows what to show us.
 var camera = new BABYLON.FreeCamera("Camera", new BABYLON.Vector3(0, 0, -10), scene);

Lets add some shapes and maybe a light.

 //Parameters are: name, number of segments (highly detailed or not), size, scene to attach the mesh. Beware to adapt the number of segments to the size of your mesh ;)
 var sphere = BABYLON.Mesh.CreateSphere("Sphere", 10.0, 1.0, scene);
 var torus = BABYLON.Mesh.CreateTorus("torus", 5, 1, 20, scene, false);
 //a light source to make things look pretty
 var light0 = new BABYLON.PointLight("Omni0", new BABYLON.Vector3(0, 100, 100), scene);


Now here's the trick to getting the shapes to move. We will set a function to be called just before each new frame is drawn to the screen. it's pretty self explanatory ;)

 var twist = 0;
 
 scene.beforeRender = function() {
  torus.rotation.z = twist;
  torus.rotation.x = twist;
  torus.rotation.y = twist;
  twist += 0.01;
 };

Now we will get the ball rolling by creating a render function to be looped over.
  // Render loop
  var renderLoop = function () {
   // Start new frame
   engine.beginFrame();
   // process scene 
   //NOTE: at this point the "beforeRender" will be called
   scene.render();
   // draw
   engine.endFrame();

   // Need this to render the next frame
   BABYLON.Tools.QueueNewFrame(renderLoop);
  };
  
  //Need this to call the renderLoop for the 1st time
  BABYLON.Tools.QueueNewFrame(renderLoop);

One final this we should do is to check if the browser supports WebGL
}// END OF babylon funciton

//Check it there browser is supported
if (BABYLON.Engine.isSupported()) {
 babylon();
}
else{
 alert("Sorry! WebGL is to cool for your Browser")
}
and you are done!
Have fun :D
... continue reading!

Saturday, 28 September 2013

"Comb" Library: Logging (2 of 2)

Hi! Before continuing note this is the second part of my "Comb" logging guide. For part one see: "Comb" Library: Logging. Else, on we go.

In this part let's cover the configuration of the logging system by calling the logging configuration function comb.logger.configure that will state what level should be stored/outputted to where.

Before this we need to know about Appenders. Appenders are the end points that can be attached to logers.

Multiple appenders are already included as part of the Comb Library
  • FileAppender - log it to a file
  • RollingFileAppender - log it to a file up to a customizable size then create a new one.
  • JSONAppender - write it out as JSON to a file.
  • ConsoleAppender- log it to the consol

To declare a appender and its target, it would look something like this.
var myLogger = comb.logger("my.logger")
    .addAppender("ConsoleAppender")
    .addAppender("FileAppender", {file:'/var/log/my.log'})
    .addAppender("RollingFileAppender", {file:'/var/log/myRolling.log'})
    .addAppender("JSONAppender", {file:'/var/log/myJson.log'});

Level class used to describe logging levels. The levels determine what types of events are logged to the appenders for example the if Level.ALL is used then all event will be logged, however if Level.INFO was used then ONLY INFO, WARN, ERROR, and FATAL events will be logged. To turn off logging for a logger use Level.OFF.
comb.logger.configure();
//the loggers you create now will have a ConsoleAppender
OR
comb.logger.configure(comb.logger.appender("FileAppender", {file : '/var/log/my.log'}));
//loggers will have a FileAppender

The Cool part(Nerd time ;) Let's create a configuration file.
We configure by passing a block JSON to the "configure" function.

Configuration object layout:
  • "name space"(object attribute) -> Object
    • level(object attribute) -> String
    • appenders(Array) -> objects
      • name -> String
      • level -> String
      • type -> String
      • file -> String
      • pattern -> String
      • overwrite -> String

Example from the comb site:
    comb.logger.configure({
        "my.logger": {
            level: "INFO",
            appenders: [{
                //default file appender
                type: "FileAppender",
                file: "/var/log/myApp.log",
            }, {
                //default JSON appender
                type: "JSONAppender",
                file: "/var/log/myApp.json",
            }, {
                type: "FileAppender",
                //override default patter
                pattern: "{[EEEE, MMMM dd, yyyy h:m a]timeStamp} {[5]level} {[- 5]levelName} {[-20]name} : {message}",
                //location of my log file
                file: "/var/log/myApp-errors.log",
                //override name so it will get added to the log
                name: "errorFileAppender",
                //overwrite each time
                overwrite: true,
                //explicity set the appender to only accept errors
                level: "ERROR"
            }, {
                type: "JSONAppender",
                file: "/var/log/myApp-error.json",
                //explicity set the appender to only accept errors
                level: "ERROR"
            }]
        }
    })

You can also log directly to levels with
    var logger = comb.logger("logger");
    logger.log("info", "my message");
    // or if it is one of the default types
    logger.info("my message");

Here the list of pre-supported functions
    logger.debug("debug message"); logger.trace("trace message"); logger.info("info message"); logger.warn("warn message"); logger.error("error message"); logger.fatal("fatal message");
... continue reading!